
| Tech Talk Index | Radio Control Index | Main Index | by Jim Ewing, East Coast Model Center |
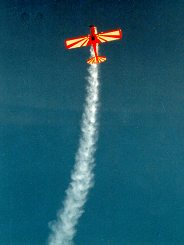 If you have seen our 1999 catalog, you have probably noticed the smoke trailing Decathlon on the front cover. The plane is powered by a Saito .90 4-cycle and the smoke system that was used is described here so you can start making smoke signals with your 4-stroke powered model.
This document is also available in PDF format:
Making Smoke Signals.pdf (220k)
Preparation
In setting up your model for producing smoke there are a couple of basic requirements you must have in place to make the system feasible. First, the model must be of sufficient size so that there is room for the extra fuel tank for the smoke fluid and that it can carry the extra weight (don't forget to rebalance the plane after installation!). Secondly, you will need an extra channel on your radio system to activate the smoker valve. This can simply be controlled by a non-proportional channel with a 2-position switch.
| Qty | Part No. | Description |
|---|---|---|
| 1 | DUB255 | Super Smoker Valve |
| 1 | DUB335 | Kwik Fill Fueling Valve - Gas |
| 1 | DUB362 | Tap & Drill - 6-32 |
| 1 | DUB400 | Gas Conversion Stopper |
| 1* | DUB406 | Fuel Tank - 6oz |
| 1 | DUB520 | EZ Fill Fuel Pump & Container |
| 1 | FOR109 | Fuel Fitting Set Large |
| 1 | FOR150 | Check Valve - Gas |
| 1 | JBW1000 | J B Weld |
| 1 | K&S121 | 1/8" Soft Brass Tubing |
| 1 | MDWSO | Super Dri Smoke Oil (US Gal) |
* Choose tank size appropriate for your project |
||
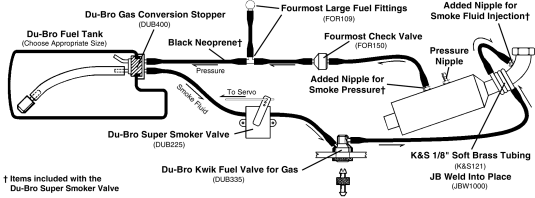
Once you have determined that your model is capable of adding a smoke system, gather the items required as shown in the diagram and listed at the left. To learn more about each product, click the part number to go to an information page.
The only special tools required are a drill (#36) and 6-32 tap (part number DUB362) to install the pressure nipple that comes with the Du-Bro Super Smoker Valve.
How the System Works
When your engine is operating, the pressure in your muffler chamber will rise and fall, depending on the point in the combustion cycle. We can use the positive pressure created to pressurize the smoke fluid tank. To filter out the negative pressure in the cycle, we use a one-way or check valve between the muffler and tank.
The pressurized tank forces the smoke fluid through the tubing to the muffler. The Super Smoker Valve, activated by the servo of an extra channel, can cut-off or allow the fluid to flow. To produce proper smoke, the smoke fluid must be pre-heated and this is accomplished with the help of the soft brass tube coil wrapped around the muffler header. This pre-heating vapourizes the smoke fluid to produce beautiful, bellowing smoke. Four stroke engines are ideal for this as their mufflers tend to run much hotter than with two strokes.
A Fourmost tee fitting is used in the pressure line between the check valve and the tank to provide a way of relieving the pressure in the tank after your flight, and allowing the air to escape when you are filling. The Fourmost fitting is used as a plug after filling. The Du-Bro Kwik Fueling Valve is an ideal way to fill your smoke fluid tank and is placed in the line between the muffler coil and the Smoker Valve. Ideally it would be better to put the Kwik Fueling Valve between the Smoker Valve and the tank so you would not have to turn the radio on to open the valve for refueling, however, the Smoker Valve would be typically located further back in the fuselage with the Kwik Fueling Valve nearer the engine, usually mounted in the cowling area. This would require a considerable amount of plumbing to accomplish. Choose the format that best suits your application!
For storing, carrying, and loading your smoke fluid, we recommend the Du-Bro EZ Fill Fuel Pump (DUB520) which is suitable for gas or glow fuel as well as smoke fluid. Note that all components of the system must be rated for gasoline use rather than glow, to be compatible with the smoke fluid.
Procedure
Using the tap and drill, install one of the pressure fittings included with the Smoker Valve to the body of your muffler and the second to the header for smoke fluid injection. Install this fitting as close to the head as practical. Wrap the soft brass tubing around the header, making a closely spaced coil. Use the JB Weld to secure the coil in place. We actually wrapped the coil on both sides of the installed nipple to help keep it secure. You may need to use some brass tubing to create the bend between the coil and the nipple as the neoprene may kink, depending on your setup.
Install the rest of the components as shown in the diagram. Ensure that the check valve is in the proper direction giving pressure to the tank. Again, don't forget to rebalance your aircraft once complete. If you can mount your smoke tank at the center of gravity, so much the better.
Remember, not all kinds of smoking are bad for your health. This kind of smoking can create all kinds of excitement!
The world's most extensive hobby shop web site! — Click on our logo for a visit!