| ITEM | QTY. | DESCRIPTION | |
|---|---|---|---|
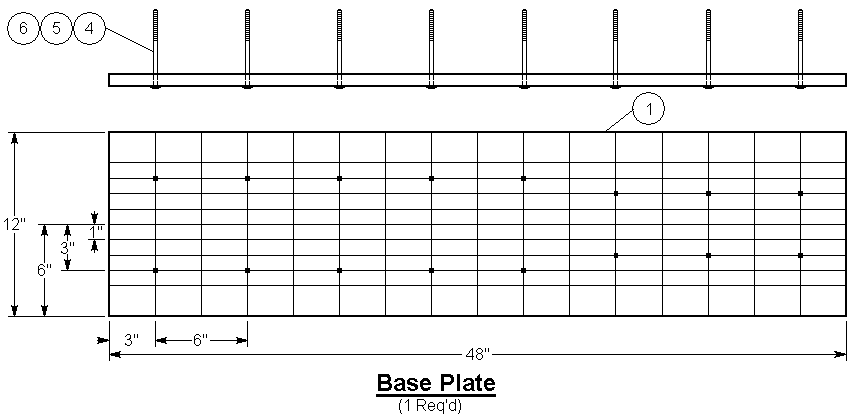
| 1 | 2 | 3/4" x 12" x 48" Plywood | |
| 2 | 32 | 1/8" x 3 3/4" x 4" Hardboard | |
| 3 | 32 | 1/4" x 1/2" x 3 3/4" Plywood | |
| 4 | 16 | 1/4-20 X 5" Carriage Bolt | |
| 5 | 16 | 1/4" Flat Washer | |
| 6 | 16 | 1/4-20 Wing nut |
The stock pieces are first cut to length. The ¼" holes for the carriage bolts are drilled in the base plate. The working surface of the base plate is sanded with 320 grit sandpaper and finished if desired. The guide lines are then applied. Any desired method can be used. The recommended method is to use a Sharpie Extra Fine Point permanent marker to draw the lines. Inserting the carriage bolts through the appropriate holes completes the construction of the base plate.
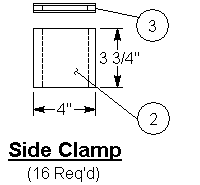
The pieces for the side clamps are cut next. It is recommended that these pieces be cut on a table saw that has a rip fence so that each piece will be the same size and all corners square. The pieces should be glued with a good wood glue such as Titebond and clamped and left to cure overnight. Foam insulation tape (1/2") can be added to one of the 3 3/4" edges to protect the balsa fuselage parts during assembly. Finally, the side clamps are placed over the carriage bolts and the washers and wing nuts are added and the fuselage assembly fixture is ready for use.
The fuselage assembly fixture is relatively simple to use. All fuselage side doublers and motor mounts should be in place before the assembly is started. The location of the formers must be marked on the fuselage sides and a vertical centerline is marked on each former. The side clamps are moved back so that the fuselage parts can be set in position. The fuselage sides are placed between the side clamps. The formers are placed in position with the center mark of the former aligned with the centerline of the base plate and with the formers aligned with the location mark on the fuselage sides. The side clamps are moved inward so the the fuselage sides contact the formers. The side clamps are adjusted so that the formers are centered on the base plate and parallel with the crosswise grid lines of the base plate. If CA is being used to join the fuselage, it can be applied at this point. Otherwise, the side clamps of one side only are loosened, glue is applied to the components which are then returned to the appropriate position, then the loose side clamps are returned to the clamping position. The fuselage can be removed when the glue has cured sufficiently. It can be left in position while top or bottom pieces are added to ensure that no warpage occurs during subsequent steps of construction. This fixture will greatly improve the symmetry of the fuselage and can also speed construction.