The performance of a model is directly
dependent the accuracy of the construction of the wing. Alignment of the
wing components during construction is critical to the stability of the finished
model. Many kits provide tabs on the ribs to maintain the correct alignment
during assembly over the plans. This is an effort by the kit manufacturers
to help modelers but this is not always the best solution. If a modeler
is scratch building from plans, he needs a way of keeping everything straight.
There are fixtures which are commercially available which do a very good
job. Every modeler should have a fixture which helps in construction of a
wide variety of wing styles and sizes.
The wing jig that is shown here is easy to
build from readily available materials using common tools. The skills required
to construct this wing jig are well within those of many beginners. It
is easy to assemble and use and works with straight, tapered, swept, and
delta wings. It can be permanently mounted to a work bench, a building board,
or taken apart for storage.
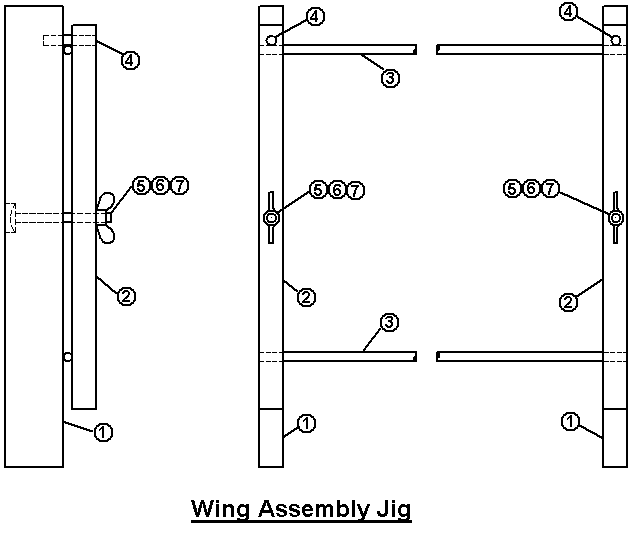
Bill of Materials Materials listed are for one (1) complete assembly
ITEM
QTY.
DESCRIPTION
1
2
1" x 2" x 12" S4S Stock
2
2
1" x 1" x 10" S4S Stock
3
2
1/4" Dia. Alum. Arrow Shaft x 36" Lg.
4
6
1/4" Dia. Hardwood dowel x 2" Lg.
5
2
1/4-20 X 2 3/4" Stove Bolt
6
2
1/4-20 Wing nut
7
2
1/4" Flat Washer
Construction begins with obtaining the
materials required. There is nothing critical about the items listed. The
S4S (surfaced four sides) stock can be pine, fir, spruce or whatever is readily
available. The actual dimensions of the stock is less than the designated
size. For instance, the 1" x 2" stock is closer to 5/8" x 1 1/2" but this
is taken into account in the design. A 1 x 6 board can be ripped to make
the stock pieces. Hardwood dowel can be used in place of the arrow shafts
but the assembly will not be as stiff and may not work as well. The dimensions
can be increased to accommodate larger wings.
The stock pieces are first cut to length.
The ¼" holes for the alignment dowels and the stove bolts are drilled
by stacking Item 1 on Item 2 and drilling both pieces at the same time. The
recess for the head of the stove bolt is cut next. If the fixture will be
permanently mounted to a workbench, two (2) pilot holes for #10 wood screws
should be drilled and countersunk in Item 2. Two (2) of the dowels, Item 4
are glued into the hole in Item 2. The four (4) remaining dowels are inserted
into the ends of the arrow shafts. The prevents the tubing from being crushed
when the locking bar is clamped down. Inserting the stove bolts through the
appropriate holes completes the construction.
The wing jig is relatively simple to use.
The ribs are first cut to shape and finish sanded. If the wing that is
being build is not a straight type, the ribs should be numbered from the
root to the tip. The ribs are stacked so that the spar notches are all in
alignment. A drill press is used to drill ¼" holes through the stack.
One of the holes should be located on the centerline of the ribs about 1"
from the leading edge. The other is located on the centerline about 1" from
the trailing edge.
Next, the stack of ribs for one wing is
slid onto the support rods. If gear blocks will be installed, the wing must
be built upside down. The support rods are placed on the fixture bases with
the forward support rod firmly against the alignment dowels. Finally, the
locking bars are placed over the alignment dowels and the stove bolts and
the washer and wing nuts are tightened.
The wing is now ready for assembly. The
ribs are slid into position over the plans or by measuring between the ribs
to get the proper location. The spars, leading edge, trailing edge and sheeting
are attached to the ribs. After the glue sets, the entire assembly can be
flipped over and the sheeting for the opposite side can be installed. After
sufficient time has been allowed for the glue to set and the assembly to
become rigid, the wing can be removed from the support rods. The next wing
is done in the same manner but care must be taken to assure that the ribs
are stacked in the opposite direction to produce a rib for the opposite side.
That is all that is required to produce
a wing jig for trouble free operation. It is inexpensive, easy to build,
easy to use, and easy to store. Using the wing jig properly, a modeler can
produce a wing that is free of warps.